Getting Started
Set up Autopipe in two parts: a server machine that runs your pipelines, and an AI-app machine that talks to it.
How AutoPipe is structured
Two machines are involved in every Autopipe setup:
They can be the same physical computer (e.g. set up your Mac to play both roles) or two different ones (e.g. a Mac running Claude Desktop, a separate Linux box doing the work).
The next two sections set each machine up independently. Pick the OS tab that matches your machine in each section - they don't have to be the same.
Set up your server machine
This is the machine that will actually run pipelines (build Docker images, execute Snakemake, store results). It needs Docker and an SSH server.
2.1 Install Docker Desktop
Install Docker Desktop for your Mac chip. Pick Apple Silicon if your Mac uses an M-series chip, or Intel otherwise.
After installation, launch Docker Desktop. When the whale icon appears in the macOS menu bar (top right of the screen), Docker is ready to use. Leave it running - quitting it will stop your pipelines from running. Click the icon to confirm Docker is active:

If the whale icon shows "Docker Desktop is starting…", wait until it finishes - pipelines will fail until Docker is fully running.
2.2 Enable Remote Login
- Open System Settings
- Go to General → Sharing → Advanced
- Toggle Remote Login on (enter your Mac password if asked)
On older macOS the toggle is directly under General → Sharing without the Advanced submenu.
2.3 Run the setup script
Open Terminal and run:
The script installs everything Autopipe needs and prints the SSH info (Host, Port, User, Repo Path) at the end. Note these values for Section 4 - once you have them, you can close the Terminal.
Set up your AI-app machine
This is the laptop or desktop where you'll chat with Claude Desktop. If it's the same machine as your server, you're just installing two more apps on it.
3.1 Install Claude Desktop
Autopipe works with any MCP-compatible AI app. We recommend Claude Desktop:
If you use Codex CLI, Gemini, or another MCP client, the rest of this guide still applies.
3.2 Install the Autopipe desktop app
Download the macOS installer for your chip:
Drag AutoPipe.app into the Applications folder.
macOS may block the app the first time you open it ("unidentified developer"). Allow it once with this Terminal command:
Configure Autopipe
Open the Autopipe app on your AI-app machine. Walk through the setup screen top to bottom.
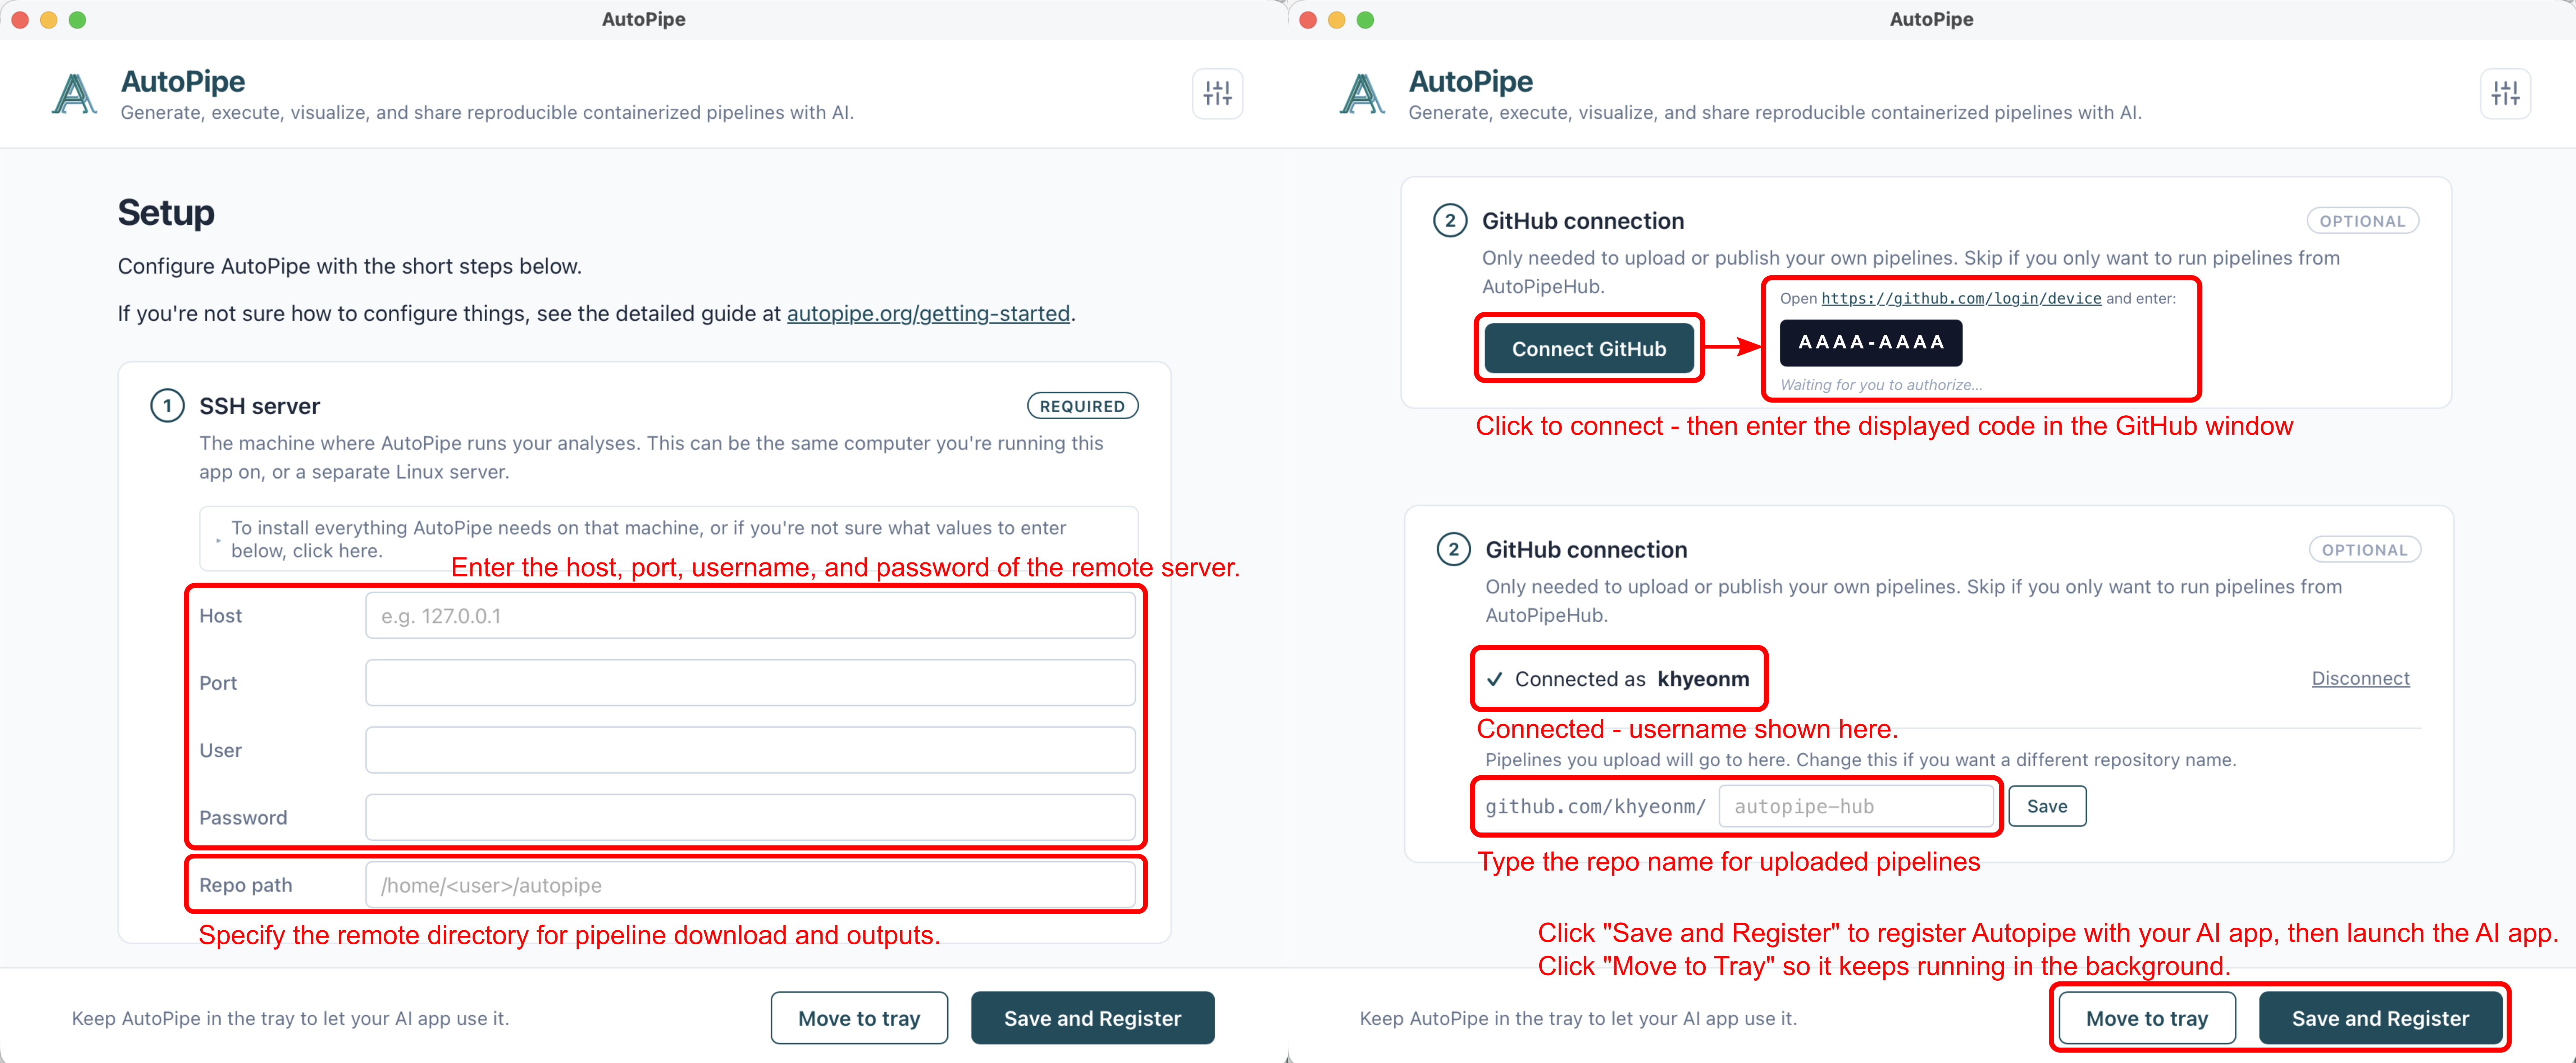
4.1 SSH connection
Paste the values that the setup script printed in Section 2.
4.2 GitHub & Save
The five numbered callouts on the screenshot above map to the steps below:
- ① Click Connect GitHub - a code appears, and the GitHub login window opens.
- ② Log in to GitHub and enter the code in that window. Your username appears here once you're authenticated.
- ③ Enter the repository name where your pipelines will be uploaded.
- ④ Click Save and Register to register Autopipe with your AI app, then launch the AI app.
- ⑤ Don't quit Autopipe - click Move to tray.
Restart your AI app
If Claude Desktop (or any other AI app you're using) was already running before you finished Section 4, you must fully quit it - closing the window is not enough. The MCP server list is only re-read when the app starts fresh, so a still-running instance will not see Autopipe.
- macOS: click the Claude icon in the top menu bar → Quit Claude. The icon should disappear. Then reopen via Spotlight.
If you're not sure whether Claude was running, quit and relaunch anyway - it's safe and only takes a few seconds.
Run your first pipeline
You're done. Talk to your AI to drive each step — expand the example prompt to see what to ask:
- Find or generate a pipeline
Search the AutoPipeHub registry, or describe a new one from scratch and Autopipe generates the Snakefile and Dockerfile.
Example prompts
- Build the Docker image
Build the container that will run the pipeline.
Example prompt
- Run on your data
Point Autopipe at your input files — a dry-run validates the DAG first, then the full run executes.
Example prompt
- See the results in the viewer
When the run finishes, open the in-browser viewer (images, plots, tables, logs).
Example prompt
- Remove a pipeline from AutoPipeHub
If you no longer want a pipeline you published to appear on the AutoPipeHub registry, ask Autopipe to take it down — your local copy stays intact.
Example prompt
Troubleshooting
What is the "tray", and where is it?
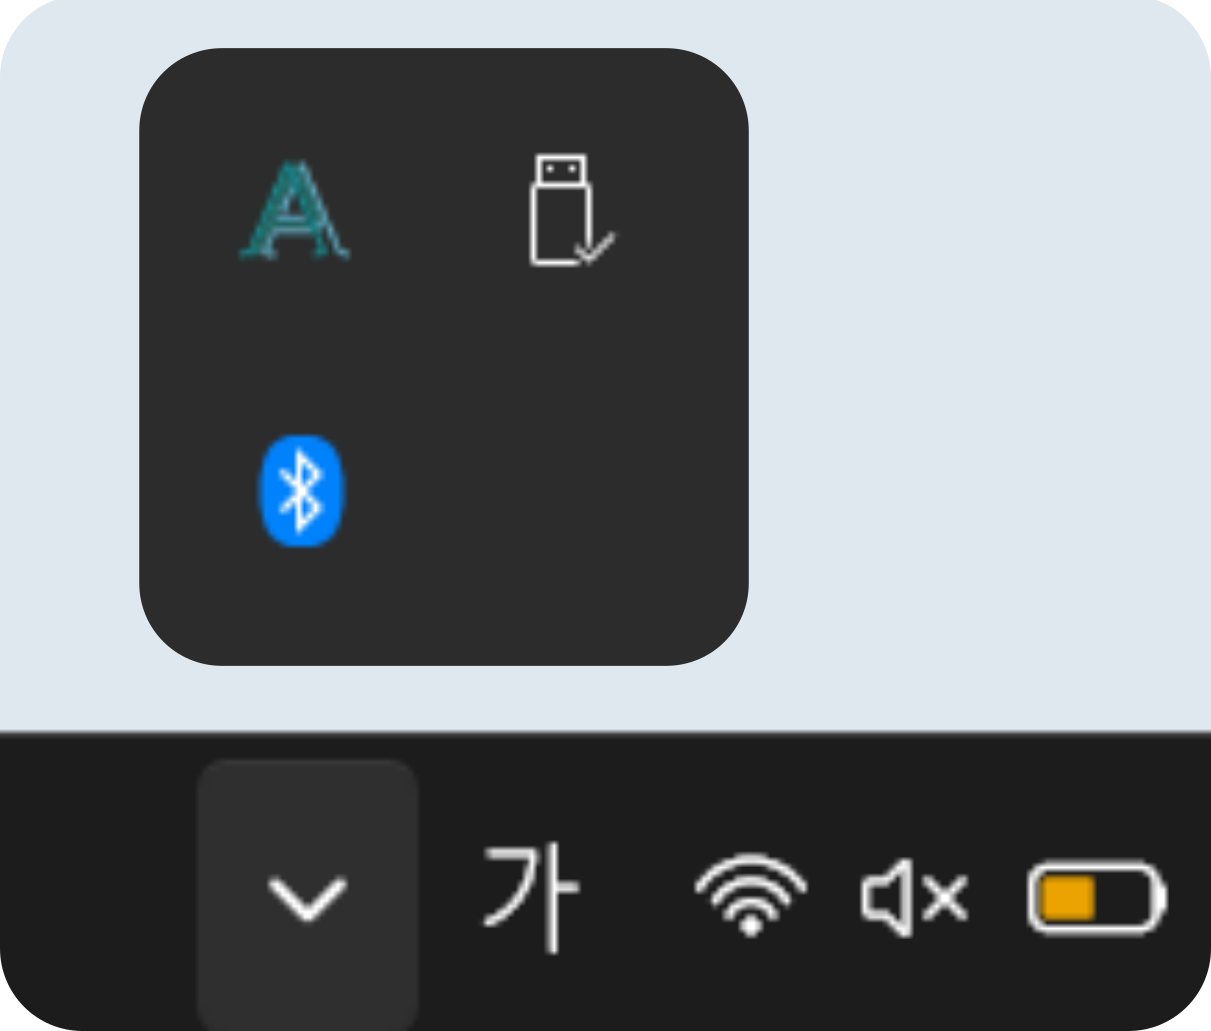
The tray (also called the system tray or menu bar) is the strip of small icons your OS uses to show background apps that are still running but don't have a visible window.
macOS - the tray is the right-hand side of the menu bar at the top of the screen. After clicking Move to tray, look for the small Autopipe "A" icon there:

Windows - the tray is the area on the right of the taskbar at the bottom of the screen. Some icons are hidden behind the small ^ arrow; click it to expand. The Autopipe "A" icon appears there once you click Move to tray:
If you can't find the Autopipe icon in the tray, the app may have been quit instead of minimised. Reopen it from Applications (macOS) or the Start menu (Windows) and click Move to tray again.
"SSH connection failed" or "SSH handshake failed"
- Double-check the password (typos are common).
- macOS server: System Settings → General → Sharing → Advanced → Remote Login is on?
- Windows server (WSL): Is the PowerShell / WSL window still open? Closing it stops the SSH server.
- Test the SSH connection directly from a terminal:
ssh <user>@<host>.
"private or unavailable" - pipeline download fails
The remote server is missing the GitHub CLI (gh) or has a PATH issue. Re-run the setup script on the server:
"Docker is not in PATH"
Re-run the setup script. If Docker is still missing on macOS or Linux, add it to a non-interactive PATH:
Autopipe doesn't show up in your AI app
- Quit your AI app completely (not just close the window) and reopen it.
- In Autopipe, click Save and Register again.
- Confirm Autopipe is still running in the menu bar (macOS) or system tray (Windows).
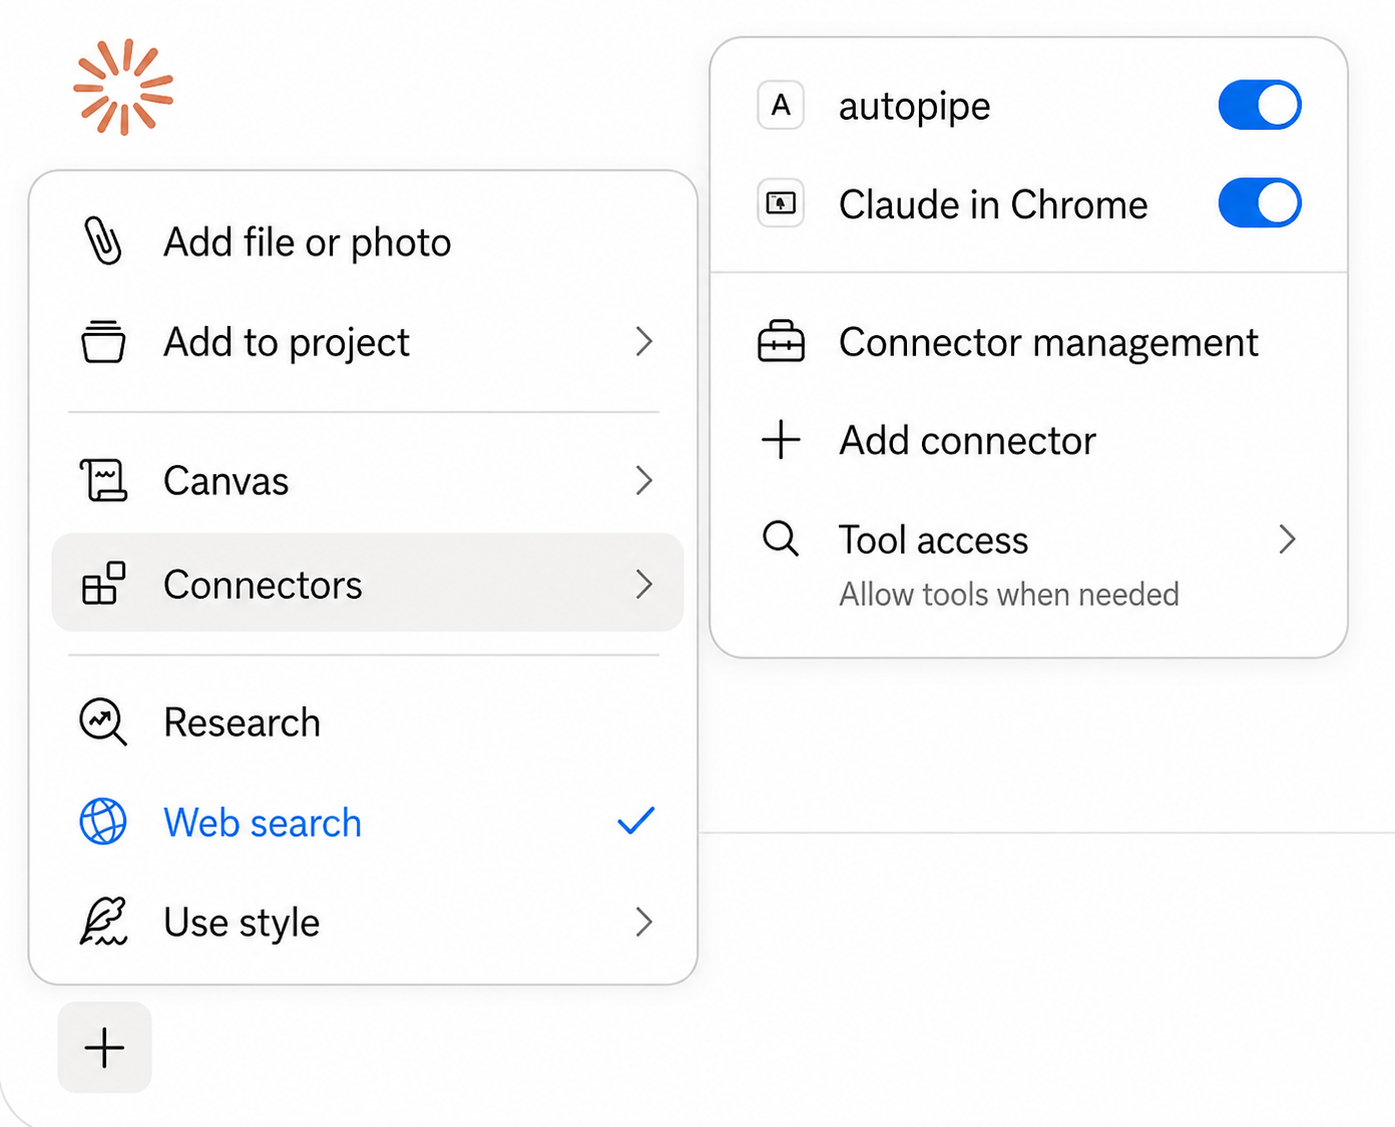
- Claude Desktop: open the + menu → Connectors and toggle autopipe off and then back on. This re-registers the tools and usually makes them reappear without restarting the app.
The setup script keeps telling you to restart, or pipelines can't find Docker
If you installed Docker Desktop, it must be running before the setup script or any pipeline can use Docker.
- Windows: type "Docker Desktop" in the Windows search box (Start menu) to find and open it; wait until the whale icon shows it's running.
- macOS: open Docker Desktop from Applications and wait for the whale icon in the menu bar.
Then re-run the setup script:
On Windows, also enable Docker Desktop → Settings → Resources → WSL integration for your Ubuntu distro.
macOS: Docker Desktop suddenly stopped
- Check the menu bar - if there's no whale icon, Docker quit. Reopen via Spotlight.
- Crashes often? Docker Desktop → Settings → Resources → bump the memory limit.
Windows: SSH worked once, then handshake fails after restarting WSL
WSL 2 assigns the Linux VM a new IP address every time it boots (typically in the 172.x.x.x range). The IP that setup.sh printed the first time is no longer valid after a WSL restart, so the address you saved into Autopipe's SSH tab is now wrong.
Fix (one-time, recommended): change the Host field in Autopipe's SSH tab to 127.0.0.1 (or localhost). WSL 2 forwards localhost traffic from Windows into the Linux VM automatically, so the address never changes again.
Alternative: grab the new IP and update the Host field. Inside WSL:
The first token in the output is your current WSL IP. Paste it into Autopipe's Host field and click Save and Register.
If service ssh status reports inactive, start it manually with sudo service ssh start, or re-run the setup script - it configures WSL to start the SSH server automatically on every boot.
Windows: Ubuntu window keeps closing
Reinstall WSL:
Windows: wsl --install fails or "Virtual Machine Platform" / "virtualization" error
Hardware virtualization needs to be enabled in your PC's BIOS for WSL 2 to run. On most modern PCs it's already enabled - if it isn't, the WSL installer surfaces the error.
Verify the current state in PowerShell:
If the line shows Virtualization Enabled in Firmware: No:
- Reboot and enter BIOS (usually F2 / F10 / Del during the boot logo).
- Find the CPU settings and enable Intel VT-x (Intel) or AMD-V / SVM (AMD).
- Save, exit BIOS, and run
wsl --installagain from an Administrator PowerShell.
Windows: you forgot your Ubuntu (WSL) password
You don't need to reinstall - reset the password from root (no data loss). In PowerShell, enter Ubuntu as root (root needs no password):
Then reset your user's password (your username is shown before @ in the normal prompt, or run ls /home to find it):
Type a new password twice, then exit. Use the new password in Autopipe's SSH tab.
Only if WSL itself is broken (not just the password), reinstall instead: wsl --unregister Ubuntu (erases everything) then wsl --install -d Ubuntu.
Windows: how do I get a file's full path to paste here?
In File Explorer, right-click the file → "Copy as path" (hold Shift while right-clicking if you don't see the option). Paste it into the chat - it looks like C:\Users\you\data\input.fastq. No need to convert it; Autopipe rewrites Windows paths automatically.